
Note: this article was published originally as the 6th chapter in my Relearning MSX series.
We ended the previous post with openMSX configured to emulate a Panasonic FS-A1GT with a Sunrise ATA-IDE interface and a generic 128 MB hard drive split in four 32 MB partitions, as in this diagram:

Panasonic FS-A1GT with Sunrise ATA-IDE and hard drive
However, when adding the Sunrise ATA-IDE extension to openMSX it also adds a virtual CD-ROM drive to the emulated MSX, so what we actually have is this:
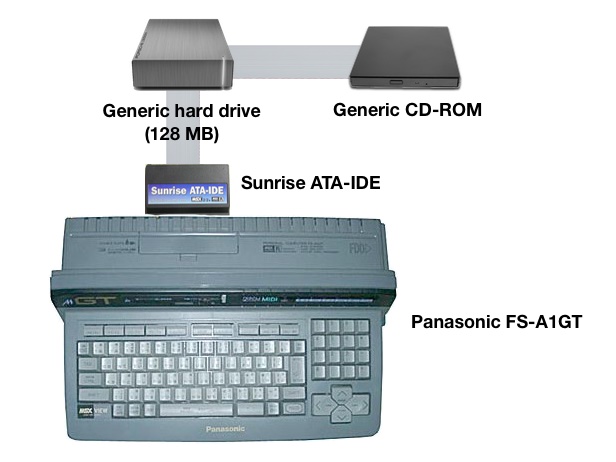
Panasonic FS-A1GT with Sunrise ATA-IDE, hard drive and CD-ROM
We don't care about the CD-ROM drive, but we'll leave it in case we need it for something else in the future. We just have to keep in mind that it's there, because in this post we'll be copying files from the FS-A1GT's floppy drive and we'll need to know what drive letters are assigned to each device.
Another thing that you need to take into account is that we need to format the hard drive partitions. If you were following the instructions in the previous post and created them using the diskmanipulator command, then openMSX already did this for you and you're good to go. If you're doing this on a real MSX then probably there's an utility that you need to run to create and format the disk partitions. Check your interface's documentation for this, because different interfaces use different tools.
Let's continue where we left it in the previous post.
Installing MSX-DOS2

MSX-DOS2 ad, MSX Magazine (January 1989)
As I explained in the first chapter of this series, MSX-DOS2 consists of both a hardware part (a cartridge containing a ROM), and a couple of files on a floppy disk: COMMAND2.COM and MSXDOS2.SYS.
We won't bother with the ROM part because that's already part of the Panasonic FS-A1GT's ROM contents, so just download the MSX-DOS2 disk image (hosted at msxarchive.nl):
MSXDOS2E.DSK (English version, 360 KB)
MSXDOS2J.DSK (Japanese version, 360 KB)
Please note that you only need one of these disks. The English version will set the display to text mode and will show English messages. The Japanese version displays Japanese messages, but it runs in one of the graphics modes. Because of this, when the text in the screen scrolls up the screen redraws will be slow. I recommend the English version.
Next, create a folder somewhere in your computer to save all the MSX disk images we will use. I like to keep mine under ~/.openMSX/Disks (I'm using a Mac), but feel free to use any location you want. From now I will refer to this folder as the Disks folder. Go ahead and move the MSXDOS2E.DSK (or MSXDOS2J.DSK) to the Disks folder.
Next, start openMSX if it wasn't running already. Remember the command line from the previous chapter if you're on a Mac!
You should see the MSX BASIC screen again. We need to insert the MSX-DOS2 disk image into the MSX in order to copy the operating system files. From the openMSX menu (CMD+O on a Mac, Menu key on Windows), choose Insert Disk... (drive A), navigate to your Disks folder and choose the MSX-DOS2 disk image.

Now what we have is something like the following diagram. An FS-A1GT with an external hard drive, a CD-ROM drive, and the MSX-DOS2 floppy disk in the internal drive:
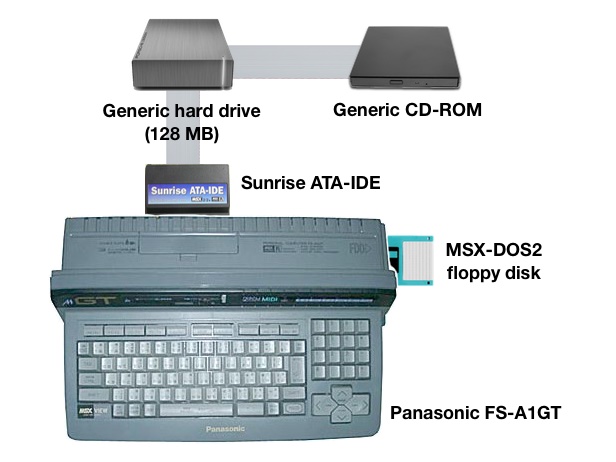
Panasonic FS-A1GT with external hard drive, CD-ROM and a floppy disk
Let's check the contents of the MSX-DOS2 floppy. In MSX BASIC, the command to display the files on a disk is, well, FILES. Run this command in MSX BASIC and let's see what happens:

MSX BASIC "File not found" error after FILES command
What the f... happened here? The File not found error message is telling us that there are no files in the disk. How can that be?
Remember that at the beginning of this post I said that we have to keep in mind that we have a virtual CD-ROM? Well, this is why. What's happening here is that the emulated MSX is booting from the first drive available (the first partition of the hard disk image), and that disk doesn't contain any files.
On an MSX, disk drives use letters, in exactly the same way as MS-DOS or Windows. Usually, the first two drive letters (A: and B:) are in use by the computer's floppy disk drive(s). However, an MSX can only boot from drive A:, and this is why the Sunrise ATA-IDE interface (and other hard disk interfaces) enumerate the hard drive partitions first, leaving the floppy disk drive(s) last.
These are the drive letters we have in the emulator right now:
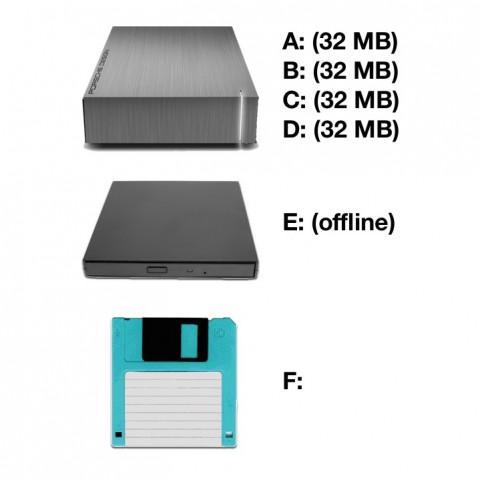
Drive letters in the emulated FS-A1GT
The drives A:, B:, C: and D: are the four partitions in the hard disk image, E: is the CD-ROM, and F: is the floppy disk drive.
When we ran the FILES command in the emulator it didn't find any files because MSX BASIC started from drive A:, but the MSX-DOS2 disk image is on drive F:. Let's try running the FILES command again, this time telling the computer to show the files in drive F: (the floppy disk). Run this command in MSX BASIC:
FILES"F:"
This time you should get the list of files in the MSX-DOS2 disk image:

List of files in the MSX-DOS2 floppy disk
It worked! We can see the MSX-DOS2 files in the disk: MSXDOS2.SYS, COMMAND2.COM, a couple of .BAT files, and also two directories, UTILS and HELP, though MSX BASIC isn't very helpful and those two directories look exactly the same as regular files.
To be able to boot from MSX-DOS2 we just need to copy the MSXDOS2.SYS and COMMAND2.COM files to the A: drive, so let's do that. Run the following commands under MSX BASIC:
COPY "F:MSXDOS2.SYS" TO "A:"
COPY "F:COMMAND2.COM" TO "A:"

Copying MSX-DOS2 files to drive A:
You can see that I'm typing the commands in uppercase, but this is just a matter of style to make the screenshots look cool. MSX BASIC doesn't care whether you run commands in lower or upper case.
If there were no errors during the copy then MSX-DOS2 is now installed. Reset the MSX from the openMSX menu, and instead of booting to MSX BASIC you should see the MSX-DOS2 copyright notice and the command prompt:

Panasonic FS-A1GT booting to MSX-DOS2
Now we're already running under MSX-DOS2. However, we still need to copy a few more files from the floppy disk. Remember that there were a couple of directories (UTILS and HELP). UTILS contains a few external commands, and HELP contains help files for MSX-DOS2 commands.
Under MSX-DOS you can use the DIR command to display a list of files in the drive, in exactly the same way as under MS-DOS or the Windows Command Prompt:

MSX-DOS2 "dir" command
Note: the ¥ (yen) character is the same thing as the backslash character (\) on your keyboard. This is because Japanese keyboards use the yen symbol instead of the backslash. If you hadn't noticed, the FS-A1GT's keyboard is in Japanese.
To complete the MSX-DOS2 install, create the UTILS and HELP directories in drive A: and copy the files from the floppy disk there:
MKDIR A:¥UTILS
MKDIR A:¥HELP
COPY F:¥UTILS¥*.* A:¥UTILS
COPY F:¥HELP¥*.* A:¥HELP

MSX-DOS2 files copied to A:
We'll complete the install by also copying the two .BAT files in the floppy disk. They're not technically required, but they're nice to have. Run this command:
COPY F:*.BAT A:
AUTOEXEC.BAT prepares a RAM disk and copies COMMAND2.COM there. The RAM disk becomes drive H:, and is much faster than the hard drive. REBOOT.BAT tells MSX-DOS2 to use H: for temporary data, and also to use the copy of COMMAND2.COM stored H: to make the system run faster. Finally, it sets the PATH environment variable to A:¥UTILS so the computer will find the external commands stored there.
Congratulations, MSX-DOS2 is installed. Reset your MSX (or the emulated one).
I'm sure that you want to explore a bit on your own while I prepare the next post. My advice is to take a look at the HELP command: it will display the help files from the HELP directory that we copied before. For example, if you want to display the documentation for the DIR command you would enter this in the command prompt:
HELP DIR
To see the list of documents available, just go into the HELP directory and look at the files there:
CD HELP
DIR /W
SET PROMPT ON
The SET PROMPT ON command changes the command prompt to show not only the current drive, but also the current directory:

Contents of the MSX-DOS2 HELP directory

MSX-DOS2's documentation for the DIR command
If you downloaded the Japanese version of the MSX-DOS2 floppy then these documents, and all status and error messages will be in Japanese.
That's it for now. In the following posts we'll install MSX-DOS2 TOOLS, then MSX-C v1.2.

#209 by DamnedAngel
Posted on 23/Jul/2017 01:23:21
Where is the next post? This is sooooo slow!